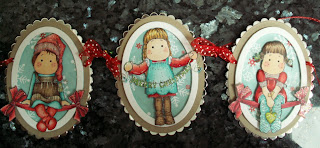
 Shapes cut with the beloved oval nesties and petite scallop oval nesties - I don't know how I would craft without these now, LOL. From the outside working toward the centre, the layers are: Gold mirri, Kraft cs, white hammered card oval (raised up on foam pads) and Bo-Bunny 'Tis the Season' paper.
 Tilda is sitting on the Magnolia bow stamp - I've shaped it a little when I put it on the acrylic block.
They're all coloured using the same Copics for a well co-ordinated effect, and (for once) I chose the colours to match the papers.
Reds - R20, R22, R27, R29, R59
Turquoise- BG10, BG15, BG49
Browns - E43, E47, E49
Green - YG03, YG06, G21
Hair (left to right) E08, E33, E47. Y21, E33, E35. E43, E47, E49.
Skin (left to right). E00, E02, R20. E00, E51, R20. E21, Eoo, R20.
The jingle bells were sewn onto the spotted ribbon and everyone has had a healthy dose of Glamour Dust, just to get blingy!
I refilled a few of my pens today and it was really easy. I plucked up the courage to pull out the chisel nib rather than 'drip and dab' and , oh joy - pens that are super juicy now!
TTFN!


This is beautiful Alison.
ReplyDeleteLouise x
Wow oh wow Alison, your garland is fantastic all that work,thanks for sharing your tips, and also for following my blog it's much appreciated xx
ReplyDeleteHugs Liz x
Oh WOW they are amazing, beautiful Tilda's
ReplyDeleteluv
Debby
This is gorgeous. Great colour scheme and I love the wire and beads - definitely worth the extra effort. Fabulous. Sara xx
ReplyDeleteGorgeous garland Alison and beautiful colours they really POP. That garland would look fabulous along my mantlepiece .... lol
ReplyDelete