Monday 28 December 2009

cue drum roll...

I mentioned my big news in my last post....well, I've been published in Creative Cardmaking - twice!Back in October I submitted three love-themed cards (with step-by-step instructions and a short introduction) on behalf of Barbara at the Windmill Craft Centre, and the remit was that they would be suitable to send to a man. And we all know how difficult it is to make cards for men, don't we!
Only one was supposed to be shown, if you were lucky enough to be accepted, so I totally didn't expect two of the three to be shown, what a surprise!


The first is this scrap-style rocking card, very dimensional IRL, with foam pads at different heights under the message. The double heart is a lift from the card I made for my DH last valentine's day.

And this one is a super cute Penny Black hedgie stamp that I've coloured with Copics and then decoupaged.

I've never submitted anything before, I'm the world worst with deadlines! It's a very funny feeling, seeing your stuff in a magazine, so to see your name there, too - well, WOW! (Even if it is a very common name, LOL).

So that's my news! Hee! It's given me a lovely feeling inside, and although I know that pride is a deadly sin, well you know what - I am a bit proud!

I'll go now before my head gets too swollen.
TTFN!

Thursday 24 December 2009

greetings

I'm just posting to wish everyone a very merry christmas and a
happy (and maybe merry?) new year!

And while I wish you that, I'm enjoying my second Snowball - oh, how retro is that! For me, it's the ultimate christmas drink, and it always reminds me of my Nana (sadly, no longer with us). She would always make me a Snowball when I was young, so it brings back sweet memories.

Speaking of snowballs (the frozen kind though, now) , we've even had snow in my neck of the woods. Snow is kind of a BIG DEAL around here- the last decent snowfall we had was in 2006, so the kids have been very happy.
Although I've not managed to get any photos of them in it, so a lost scrapping opportunity, I'm afraid. But funnily enough, I made this tiny altered tin last month, and used some of the 2006 photos I took of my youngest playing with the pugs in the snow.

Cute!

Virtually finished all the preparations now, just a few presents left to wrap - well, put into gift bags, I'm too lazy to be bothered with wrapping paper, LOL!
I decorated a cardboard wine carrier for my FIL's gift, it looked pretty good actually - and how else would you give half a dozen bottles of wine? Forgot to photograph it though.

Next time I post, I've got BIG news to share, ooh, I can't wait to tell you!
TTFN!


May health, peace, love and joy be yours for 2010.


Friday 18 December 2009

only 1 week to go..

Well, it's nearly upon us, isn't it? Christmas just creeps up on you and then all of a sudden, there's very little time to get everything done. But I have managed to finish what I need to, there's just my Dad's present to think of - he's very difficult to buy for, and when I asked him if there's anything he'd like he just said, "ask your Mum what I need"!! No help at all really, as if my Mum hasn't got enough to do!
Most of the food shopping is done, with various items hidden from the boys. Isaac (eldest DS) ate half a jar of pickled onions yesterday amongst other things....

I've had to be slightly more organised than I usually am, as I'm starting a run of 5 night duties tonight. I'm not looking forward to these nights - it's quite likely to be busy,with everyone trying to get themselves delivered before christmas.

This 'Whiff of Joy' stamp is my current favourite, I do love her little suit and I love that she can team up with these Magnolia Winter trees.
You can just make out the twinkle of the glamour dust on this shot.
So TTFN!

Monday 7 December 2009

where does my time go?

I know where it goes, actually - my shiny new toy, my gorgeous iPhone! This is my xmas pressie from DH but I couldn't wait until then- Ha, big kid aren't I.
Well I had to make sure it works, ;)

It's got quite a few time-wasting games on it and I'm now just dipping my toe into Facebook (finally).

So I've given eldest DS my beloved iTouch and left him to download various fun apps. So just imagine my surprise when I synced my phone to iTunes and along with the various games he'd gotten was "Hot Chicks" and something else very similar! Parental control kicks in...

So with all this time-wasting, I've done virtually no cardmaking this week. But I have got this card to share, but apologies for the poor lighting on the first photo. The close-up is much more true to real life colour.

She's turned out very, very cute in her brown coat and hat!

I'm going to have to write some cards out this week though - it's no good just making them is it - they need to be sent out. We received our first xmas card last week - but it looks a bit lonely at the moment, on it's own on the fireplace. Decoration time soon, I think.

And a big northern 'Ello luv' to anyone who visits from UK Scrappers - I'm in the honourable mentions on the 'Blog Bits' on the home page - wow!

TTFN!

Monday 30 November 2009

woo hoot

This was our project for my class on Sunday - fab little stocking fillers that are very cheep (Sorry - couldn't resist the pun LOL).
The paper-pieced owls are acrylic stamps from Woodware, it's such a fun set. There's a cute little bird house on the sheet too and speech bubbles with owlish sayings.
The papers are 'U Bug Me' by Bo-Bunny, double sided which I love. It just takes a bit of planning with your papers. The owls are shaded slightly and then highlighted with a white gel pen.
I experimented with pen/pencil loops to include a pen - I know that in my house, there's never a pen to be found (I'm sure I'm not the only one with this problem!)

How great is this for a teacher's gift, too? Or to sell at a craft fair?

The next bit of waffle will only make sense if you're a Twilight series fan. Feel free to skip this if you're not obsessed with Edward/ Jacob/ Bella, LOL!
I'm only just recovering from seeing "New Moon' at the cinema on Friday. I was absolutely blown away with this film, it was a brill adaptation to the book, and Jacob Black - well, what can I say.... OMG, that body...
I'm even more into the books now I've seen NM, and I've put lots of scrummy wallpapers of the lead males onto my phone - I really think it's an illness. My chum Lisa (who I hold entirely responsible for the illness) says we are now 'Twi-hards'! It's been a while since I became obsessed with a series of books like this, it's just such a lovely story about first love.
I'm even going to go and see it again at the cinema and I've never paid to see a film twice. Definitely, definitely ill...
TTFN!

Sunday 22 November 2009

a jiggler

Ok, I have been dying to share this -a very jiggly card indeed! Remember my last easel card with the greeting on the acetate strip? Well, I thought the acetate would look cute with snowflakes that move at the slightest disturbance.I've used the Spellbinders 'Snowflake Wonder' die set and cut three sets of flakes from white glitter card. I just love snowflakes and this die set ticks all my boxes.
The white panel is embossed with a cuttlebug folder, but I swiped the embossing folder with Versamark before I put in the paper. Then I brushed over the panel of embossed paper with pale pink 'Perfect Pearls' and this stuck to the Versamark in the debossed areas. It's a shame the camera didn't pick this up too well, it's so pretty.


The greeting stamp is by Stampin' Up, stamped twice, punched out then layered with foam dots over another snowflake.And a side view. I had to weight the middle snowflake a bit to help drop it down away from the other two. I just added another layer of snowflake to give the extra weight.

Cute, huh. Even my Dad thinks this is nice!! How fab would this be with butterflies, birds, flowers or fairies? I could use my owl stamps for this, too.

Hi to anyone who came to my class yesterday morning! And a big thanks to Carole for being my right-hand-woman.

I'm off to bed now, I worked my first night duty of 4 last night. Bit hard to focus straight to type tbh, the spell check just worked overtime during this post, LOL.

TTFN!

Friday 20 November 2009

caught in crystal

Hi everyone, this is a photo heavy post today!
I'm sharing the cards I made for a demonstration last night, using the 'caught in crystal' technique. The end result is almost like a huge epoxy accent, one of those 'how did you do that? techniques.
This one is my favourite.


Its easy, but not a card you can make fast as the drying time is several hours. You need Glossy
accents, acetate sheet(cut down into manageable pieces), white card, glitter, stamps, inkpads, alcohol ink (optional) and a Staz-on inkpad.
So here's how.
Stamp your focal image using Staz-On onto a piece of acetate and let it dry. While it's drying, stamp a background (for the card below, I stamped swirls and snowflakes using Brilliance inks). If you want to include text, stamp it on the background, bearing in mind that the main image is going to be reversed at the end, so plan where you'll stamp your text.

Back to your stamped acetate now, it should be dry. Drizzle a generous amount of Glossy Accents over your stamped image and slightly beyond. Drip a few drops of ink into this then swirl with a gloved finger (I use light-coloured alcohol inks) and spread the glossy accents evenly. Sprinkle a little glitter into this, then take your stamped background and place it on top (stamped side to the glossy accents). Flip it over and then gently squish the acetate with your fingers, trying to get rid of air bubbles. Make sure you get the glossy accents out far enough so that you can cut it down to size, but not so far out it goes all over you and the furniture..

Leave it somewhere safe to dry (several hours, maybe overnight), and away from curious cats and children, who can't resist giving it an extra squish...

It will curl, but this actually is a good thing as when you make it up into a card, the curve looks really nice. Once it's dry you can trim it down or die cut it - well, yes, I used my nesties, you know I'm addicted to them!
On this one, I just did acetate, glossy Accents and glitter, no stamping on the acetate and no alcohol ink swirled in. All the stamping is on the background using dye inks, which ran a little with the moisture from the Glossy Accents. A bit 'distress', Sir Tim Holtz would be proud...


This blue one was my first attempt, and I didn't use enough glitter. And you know what a glitter queen I am.

And this one is another fave.
Serendipity moment - I wiped off the Staz-On stamped seed head, thinking I'd do it again, and it left behind a sort of ghost image, which I liked. (If you've got a grey Staz-On pad, you could probably get the same effect using that).
I stamped the frame and text in dye ink, knowing that would run a little, then stamped the seed heads in green chalk ink, which doesn't run.

Of course they are much more twinkly when you see them in real life. I had the devil of a job trying to photograph these, what with all the relections on the acetate!
I also tried this using cheap acetate, but that was not successful as it went very wrinkly. But then, I peeled away the acetate and was left with the hardened glossy accents trapping all the glitter, which was a bit unexpected. It'll go in the 'interesting things' box and I might find a use for it one day.

Hi to everyone who came last night btw, it was a great evening, and I know you'll all enjoy your bargains!
TTFN!


Friday 13 November 2009

lovely lizzie

Very quick share tonight.
I made this card as a quick sample to help showcase the lovely Whiff of Joy stamps available at the Windmill Craft Centre - but they sold out so fast, Barbara gave the samples virtually straight back!
But the good news is, she's re-ordered and hopefully they won't take too long to arrive.

Now Lizzie here is definitely amongst my favourites - I absolutely love her outfit and especially the boots with the pom-poms - gorgeous!
I definitely have an addiction to nestabilites, I seriously find it difficult to make a card without them these days, LOL.
The copic colours I used -
hair - Y21,Y28 E33, skin - E00 E02 R20, Clothing - R20 R22 R29 R59, Boots - E43 E47 E29, Muff , Cuffs and collar -C1, Pompoms and earmuffs - R20.

Paper is by Bo-Bunny and I used the Martha Stewart Embossing Zig-Zag punch along the opening edge.

TTFN!

Thursday 12 November 2009

Mono and minimal

This is the card I made for Diane to give to her hubby for their special anniversary.
Diane requested modern and minimal with a colour scheme of black, white, silver and a touch of red. You may have noticed that the 'Clean and Simple' style isn't my norm, but it does a body good to move out of it's comfort zone sometimes.

Its A5 in size, when closed. The sentiment is computer-generated with 'Glitterations' stickers for the numbers and it lies underneath the champagne glass focal point when the card is closed.

I found this lovely silver anniversary paper online at The Craftz Boutique and of course a few other things kinda jumped into my basket, too!

And the focal point - well, I just had to use some glossy accents on those glasses! The gems are heart shaped, with a few tiny round ones on the smaller bubbles.

And the trusty Swiss Dots cuttlebug embossing folder. I turned the embossing folder to emboss the other end of the cardstock, lining it up very carefully. I re-embossed any dots that were squashed with the second embossing, using an embossing tool. It's one of the few folders that you can do this with, I've tried with others but the embossing done by hand just isn't as deep and obviously, some of the patterns are impossible to line up. Of course, it depends on how much of your embossing is going to be on show.
And their wedding date, as requested, in the corner. I love the black glitterations on the black card.
I made a matching box, but for some reason I forgot to photograph that!
And I can let you know Diane was dee-lighted with the card and that they had a lovely anniversary!

TTFN!

Tuesday 10 November 2009

snowystacks class

I thought I'd quickly share the project I did in my class recently. This has been enormously popular - one class has turned into three sessions, everyone wanted to play! I'm sure it's because Barbara put together the class and supplies at such a fab price!

The three hour class is priced at £25 and you receive 6 Copic Ciao pens, a set of Woodware Stamps (Snowy Stacks) an acrylic block, all the card supplies and little ole me teaching! All in the quaint setting of the first floor of the Windmill, too! And I thought I'd show you my table samples all in a group, 'coz they look cute!
I can't take all the credit of course, the basic intructions for this card are out there on the web, but I did design this to fit nicely ino a 5" envelope and to be something you can duplicate very easily. You could have a little production line going in fact, just like Santa's workshop!
Well I've faffed around all morning as usual and I had all these great intentions to craft. A quick lunch and then I'm definitely going to get creating.
TTFN!

Monday 9 November 2009

easely peasy

Hi, I'm back with a post. I've had a couple of very busy weeks and , of course, the first thing to not get done is blogging.
I made three love themed cards and sent them off to a mag and hopefully (fingers crossed) I'll be published in February! This is the first time I've ever submitted anything to a magazine, and I had to do instructions an' everyfink! Unfortunately, I can't share those but I'll let you know if I'm 'in' nearer the time. I also made a silver anniversary card for a customer - the big event is tomorrow - Congrats to you both, Diane!
My Step card workshops are going well - although there was a strange episode this week when a woman had some kind of panic attack about using the guillotine :/ ...and before I knew it, Elvis had her coat on and left the building...I'm saying no more than that. I'll share the card we made in class soon.
As a bit of shameless showing off, I also showed this week's class this card. I'm entering this to the Secret Crafter Saturday challenge where the challenge is - yep, easel cards! And I did actually make it on Saturday!


The stamped greeting is punched out with the corresponding punch (both by Stampin' Up!, only available in the USA), and then a strip of acetate 'sandwiched' between it and another punched shape. The other end is stuck down behind the stamped panel.
This idea has been rolling aound in the mojo cauldron in my brain and I finally did it. It's a little b***er to photograph though - it kept bobbing around while I tried to get the photos!

Look at it - all blurred - it really is nice crisp stamping, honest! I decoupaged Tilda, the log and the tree at the left and used the dreaded smelly silicone to raise them up - I'm really not safe with this stuff, I get it everywhere, LOL. My friend, Carole, has suggested I try Pinflair glue gel so I'll give that a go. The only prob is, you cant let the acetate crease, so it would have to be in a pretty deep box. I think this will be have to be hand-delivered - I'm quite sure it'll be squished if posted. I think I'll do another of these cards and try a small charm dangling from the strip of acetate.


Oh, that mojo cauldron is bubbling now - can you hear it? I'm thinking several strips of acetate with snowflakes or baubles or elves jiggling about......


TTFN!

Monday 26 October 2009

a quickie before I go to work...

a (fairly) quick card and a quick post, that is! LOL, what were you thinking about...

So I had a go at colouring a Penny Black hedgie. I've shied away from these before, not 'cos I don't think they're awful cute, but because I didn't think they'd be good to colour. Well, of course I was totally wrong, wasn't I? They're quite fast and fun to colour, using a few shades of brown and warm grey flecks on his prickles. I followed the suggestion on the stamp and left his tummy white. I did write all my colours down on the back of the image, but then it went in the rubbish by accident! Whoops..

And then, inspired by Debby's fantastic decoupage with her cards, I thought I'd do a bit of decoupage with him. I don't normally do decoupage, as I don't usually enjoy intricate cutting out, but I did enjoy doing these.
Apart from those hearts - they were a pain... I lost a couple and had to do them again!

Then I went a bit mad with the glossy accents and he and his flowerpot got all shiny!!

And check out that gorgeous Doodlebug flocked cardstock - scrummy! Very strokeable...

Off to work soon, so TTFN!

Wednesday 14 October 2009

autumnal wedding

I think it should be safe to share this card with you. The wedding took place today, so it's OK to show this. I was asked to do an autumnal theme with leaves, so out came the gorgeous Whiff of Joy stamp.
I've used Stampin' Up More Mustard cardstock with Bo-Bunny 'Wine Dot' and 'Beau Jardin' patterned paper, gotta love all those swirls.
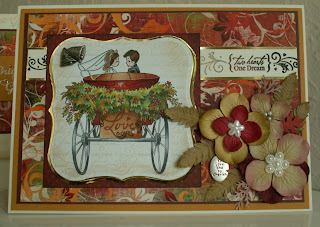
The text stamp behind the bride and groom is 'french script' by Stampin' Up, discontinued now. The 'two hearts' sentiment and the word 'love' on the carriage are by Hero Arts from a set of clear stamps. Metal wedding bells are by Making Memories, flowers and fern leaves by Prima. I dusted off my Martha Stewart fern punch and another leaf punch that I've had for donkeys years to add a bit of variety. The 'love and cherish' charm is from the USA, don't know the make of these.

And the close-up...

This time the hair colour is brunette, true to the couple IRL. I lost count of how many Copics I used to get the effect of the autumn foliage. I used a combo of Spica clear glitter pen and glamour dust, but as usual, that's very hard to capture on a photo. Just trust me, it's tastefully blingy!
And a decorated inside, using the Hero stamps again.

And the box.

Now I must tell you, it's a good thing this isn't being sent in the post - it would cost a fortune. Why - well, normally I use foam pads for dimension, but I thought I'd use silicone instead. I think I can say I used too much. Honestly, it weighs more than a card ought to, LOL.

The couple had lovely weather for their big day, hope it all went well.
TTFN!

Wednesday 7 October 2009

peaches and soup

Ah, autumn! My favourite time of year, as long as the weather is nice, that is! I like those fresh, crisp mornings and the colours in the leaves. So it was natural to choose these colours for my next few projects.
I love this Tilda stamp, 'Picking Peaches'. For me, it's got just the right combination of detail and movement that makes Tilda stamps so appealing. The patterned papers are 'Porcelain' by Basic Grey, (oh, what a surprise, I hear you say - lol) and the textured cardstock is by Stampin' Up, from the Earth palette.
The stamped sentiment is also Stampin 'Up (Oval All), punched out with the SU oval and the scallop oval punches. I think they are my best ever SU purchase, they see quite a lot of action!
Flowers and leaves by Prima, and I found the pearl flower centres in Tesco, whilst pretending to shop for groceries...
And I'm sure you recognise the Nestabilities (labels 3) and the Martha Stewart Doily Lace punch.

Look how she's reaching up on her tiptoes - cute!

Copic Recipe: E00, E02, E51, E37, E33, E31, E43, E47, R20, R32, R35, R37, R59, RV42, YR23, Y21, YG03, YG63, YG67, C1.

And the other thing I like about colder weather is the excuse to make lovely casseroles and soups...in fact, I'll share another recipe with you. I know you can buy this, but it's so nice to do it yourself. I made this today, and it was scrummy.

Broccoli and Cheese soup (4-6 portions)

2 leeks, washed and sliced
2 sticks celery washed and sliced
1 clove garlic, chopped
fresh thyme leaves, removed from stalk
Gently fry the above in a little butter until softened - don't brown them.
Add 1 head broccoli, chopped and 1 pint chicken stock (stock cube, obviously - I'm not pretending I make my own stock!)
Cook until all veg soft, and then liquidise until it's almost smooth, if it's too thick, add milk or water.
Add a good dollop of creme fraiche and grated cheese and stir in. (we like fresh parmesan or blue cheese, but it's your call here). Adjust seasoning.

If you have a go, let me know what you think!
TTFN!

Monday 5 October 2009

the reveal...

Warning - These are VERY, VERY addictive to make...I now have a little forest of paper trees on my mantelpiece!
We saw this idea at the Woodware day, and I was really taken with these cards. I chose to make them in pastels, though. The first one uses Basic Grey 'Two Scoops' - not Christmas paper, I know, but I like it for this.
The Stamped Greeting is a PSX stamp I've had for a few years, stamped in Versamark, then used with pastel chalks. The side view shows how dimensional these trees are, and I've used Woodware "Pearly Stuff' on the tree tips, then dipped the tree into white glitter.


And this one uses some very old Basic Grey paper that I've had for years - I'm still using up that paper mountain!The 'snow drifts' are edged with the 'Pearly Stuff' again, and I've used it for the snowflake dots in the background.
If you use this, gently flick the underside of the card, and the little (whispers the next word) ...nipples (!) on the pearly dots will flatten out.

Don't do what my 11yr old did, and flick it as hard as you can- I'm sure you can imagine where that leads to...Side view again...
And because more bling is GOOD, once the pearly stuff was dry, I ran around the snowline with my Quickie glue pen, and threw a bit more glitter on.

And how did I make these little trees? Well, it's a floral craft punch - the 'lilium' punch (I forgot to get a photo, sorry, try this link to have a look here, but please support your local shop by ordering it through them, the supplier is Woodware).
It punches out a 6-petalled piece, with glue tabs which you snip off. Each tree has 5 punched pieces which you reduce by 1 petal, down to a piece with 2 petals for the tree top.

Using a large embossing tool each piece then gets curled from each petal tip up towards the body, and glue each one onto a tree trunk. They're definitely not something to make in a rush, but I spent a very pleasant few hours making these.

A big thankyou to everyone who left lovely comments recently - it was absolutely lovely to read through them!
TTFN!

Saturday 3 October 2009

normal service is resumed...

I can't believe it's been almost 3 weeks since I posted - it must be a sign of impending old age that the time flies by. Remember when you were a kid and every day seemed like forever? Ah well!


I made these step cards a few weeks ago. They are my current favourites (apart from where I had to cut those intricate trees out - I didn't particularly enjoy that bit, I can tell you! All the stamps are by Magnolia, except for the white embossed dotty swirl on the Kraft CS, that's by Hero Arts.

And a close-up, since sometimes my images are 'clickable', sometimes not.

And this Edwin card uses K&Co 'Swell Noel' paper for the background - it suits the Magnolia images so well.


This Edwin is one of my favourites to colour. The circular 'north pole' stamp is coloured and then glazed with Diamond glaze, and a tiny amount of Glamour Dust sprinkled on, while it's wet.


And tearing the glitter card to make snow - gosh, I used to tear paper all the time, I hardly do it at all now.

Hope you like those cards - I'm going to find it difficult to part with these!

A couple of weeks ago I was very lucky and Barbara from the Windmill Craft Centre (who I demo for) took me along to a Woodware craft event for retailers. We did some really nice projects, and I'll be posting some of my faves over my next few posts.


I'll share a sneek peek at one of my favourites, just to keep you interested!
TTFN!